
Iterating After Assumption Testing: Key Steps
A test is only useful if it changes your next move. After assumption testing, I look at each result, label it as validated, invalidated, or inconclusive, decide whether to refine, pivot, pause, or retest, and then plan one next experiment around the biggest remaining risk.
Here’s the short version:
- I sort findings by assumption type: desirability, viability, feasibility, or usability
- I turn raw notes into plain-language takeaways tied to a decision
- I change only the part of the idea the evidence pushed back on
- I test one risk at a time, not five at once
- I keep one log for assumptions, evidence, verdicts, and next steps
That matters because 42% of startups fail because they build something the market does not need. And small sample sizes can mislead you too, especially when you set no pass/fail mark before the test.
If I had to boil the full process down, it would be this:
- Read the result without bias
- Decide what part of the idea needs work
- Pick the next riskiest assumption
- Run a small test with a clear threshold
- Record the result and choose the next move
This article lays out that loop in a simple way, so I can use each test to make a better business decision instead of just collecting feedback.
::: @figure 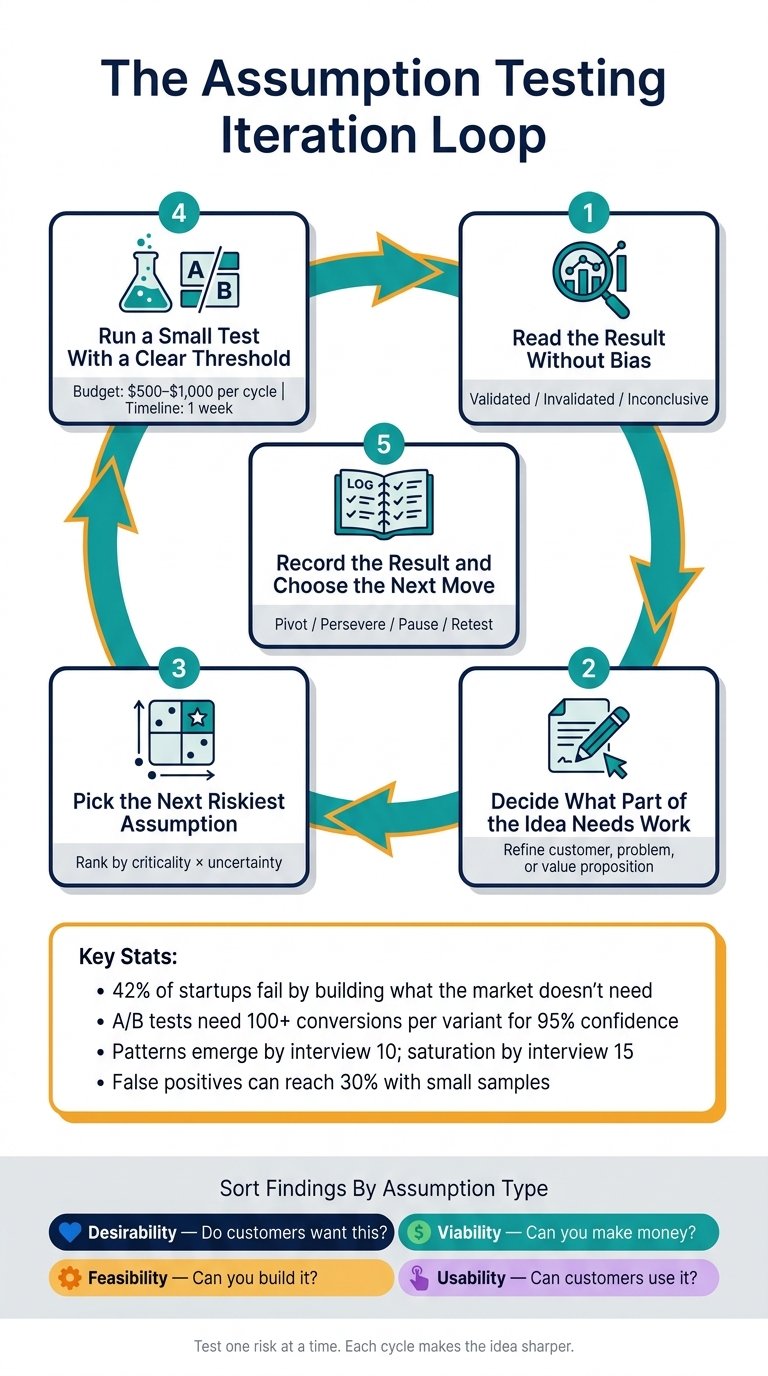 {Assumption Testing Iteration Loop: 5-Step Framework for Startup Validation}
:::
{Assumption Testing Iteration Loop: 5-Step Framework for Startup Validation}
:::
Assumption Testing: Quickly Determine Which Ideas Will Work and Which Won't
::: @iframe https://www.youtube.com/embed/c0Zpjnc1jfs :::
1. Understand What Your Test Results Actually Mean
Before you change anything about your idea, stop and read the data the right way. It’s easy to let one rough interview throw you off. It’s just as easy to get carried away by a few upbeat responses. The job here isn’t to find proof that you were right. It’s to see what the results are saying.
1.1 List and Classify Each Tested Assumption
Start by writing down each assumption you tested, one at a time. Then place each one into one of these buckets: Desirability (do customers want this?), Viability (can you make money from it?), Feasibility (can you build or deliver it?), or Usability (can customers figure out how to use it?) [1][10].
This step matters because not every failed assumption means the same thing. If usability looks weak, you may need a better onboarding flow. If viability looks weak, the whole business model may need to change. Mix those up, and you can head in the wrong direction fast.
Use those categories to decide what pass/fail should look like for each assumption.
1.2 Mark Results as Validated, Invalidated, or Inconclusive
Once you’ve sorted your assumptions, give each one a verdict: Validated, Invalidated, or Inconclusive. Set your thresholds before the test begins. If you wait until after, it becomes way too easy to explain away any result.
Apply the threshold you set in advance: above target means validated, below target means invalidated, and small or mixed samples stay inconclusive and should be tested again. A/B tests often need at least 100 conversions per variant to hit 95% confidence. Smaller samples can lead to false positives as high as 30% [4].
Then turn each verdict into something you can use to make a decision.
1.3 Turn Raw Feedback Into Clear Insight Statements
After you label each assumption, turn the result into one clear takeaway. Raw feedback, by itself, isn’t insight yet. A simple way to do this is with three parts: assumption, evidence, and decision.
For example, don’t just write “users liked the pricing.” Write something like: "Solo consultants showed interest, but price sensitivity increased sharply above $49/month." That gives you something you can act on.
Group findings by segment or use case, because repeated patterns matter more than outliers [3][7]. In many cases, patterns start to show up by the 10th interview, and saturation often comes after the 15th [9].
Focus on what each finding means for the next version, not just what showed up in the data.
2. Decide What to Change in Your Idea
Now put those verdicts to work. Change only the assumption the evidence pushed back on, and tweak the smallest part of the idea tied to it. That might mean narrowing the customer, rewriting the problem, or dropping the weak assumption altogether.
2.1 Refine the Customer, Problem, and Value Proposition
Start with desirability first. If customers don’t want the solution, product tweaks or pricing changes won’t save it [3][7]. So look for the clearest signal. If one segment leaned in while everyone else shrugged, focus on that group [13].
The fix should match the assumption that failed: customer, problem, solution, pricing, or channel. If the problem feels fuzzy, tighten it until it points to a specific pain customers mention on their own and are already trying to solve. That distinction matters. If testing shows customers can see their projects but don’t trust the data, you’re not dealing with a visibility problem at all. You’re dealing with a trust problem [7].
2.2 Adjust Solution Scope, Pricing, and Acquisition Assumptions
Once the customer and problem are clearer, move one layer deeper. Test the solution, pricing, and acquisition assumptions tied to that customer and problem. Keep the scope tight. If a feature doesn’t connect to a critical uncertain assumption, cut it [2].
When a feature gets weak engagement, don’t keep forcing it. Drop it and follow the behavior users already prefer.
For pricing, lean on revealed behavior instead of opinions. Pricing-page clicks, pre-orders, and signed letters of intent say a lot more than survey answers. A $49/month price point backed by a 4% click-through rate on a landing page gives you stronger evidence than someone saying, “Yeah, I’d probably pay for that” [8].
Use the strongest test signal to refine the customer, problem, feature set, price, and channel.
Strong demand without a repeatable acquisition channel is not a business [8]. If your early channel signals look weak, try another channel before spending more money.
2.3 Choose Between Pivot, Persevere, or Pause
After you update the weakest assumption, choose the next move: persevere, pivot, or stop. Persevere when the core assumptions still hold. Pivot when the problem is real but the solution, unit economics, or segment is off. Pause or stop when no one shows clear pain.
Use problem severity, frequency, willingness to pay, and urgency as your check. If those signals are soft, that’s your answer.
3. Plan Your Next Experiment Cycle
After you decide whether to pivot, persevere, or pause, don't test five things at once. Test the next riskiest assumption only.
Why? Because one bad assumption can still sink the whole idea. So once you've picked your next move, zero in on the single belief that could still break it.
3.1 Identify the Next Riskiest Assumption to Test
A simple way to do this is with a 2x2 matrix. Rank the assumptions you still haven't proved by criticality and uncertainty, then test the one that matters most and has the least proof behind it. Those are your high-risk assumptions: if they're wrong, the idea can fall apart [2][1].
Then re-sort the remaining unknowns into the same four categories. That makes it easier to spot which risk still sits at the top.
Once you've found the riskiest assumption, pair it with the fastest test that can disprove it. That's the key. You're not trying to feel good. You're trying to find out if the idea holds up.
3.2 Match Each Assumption to the Right Test Method and Metric
Each assumption needs a test that can give you a clear pass/fail signal fast. If the result is fuzzy, the next cycle gets fuzzy too.
Before you run anything, write the hypothesis in this format: "We believe [audience] will [action] because [value]. We will know we are right when [metric] reaches [threshold]." [11]
That small step matters more than it looks. It forces you to define what success means before the data comes in, which helps stop post-hoc rationalization of weak data [3].
"Fail criteria are specific, measurable thresholds that you define before running the experiment. They answer one question: what result would tell us to stop?" - Ton van der Linden, Strategic Innovation Advisor [3]
| Assumption Type | Recommended Test Method | Key Metric | Example Success Threshold |
|---|---|---|---|
| Customer Demand | Landing page, interviews, ad funnel | Click-through rate, signup rate | >3% CTA CTR; 6 out of 15 interviewees describe problem unprompted [3][12] |
| Willingness to Pay | Pre-orders, paid pilots, letter of intent | Conversion to payment | 10 paid pre-orders at $50 each [3][12] |
| Acquisition Channel | Small ad funnel, community posts | Cost per lead, conversion rate | CPL below a plausible lifetime value [12] |
| Usability / Solution | Clickable prototype, concierge MVP | Task completion rate, repeat usage | 5 users complete the core job unaided; >20% repeat usage [12][5] |
| Feasibility | Technical prototype, proof of concept | Accuracy, error rate | System achieves 95% accuracy within a 4-week sprint [3] |
3.3 Build a Simple Experiment Plan With Budget and Timeline
Keep the plan short. Keep it concrete.
A one-week cycle works well: plan Monday, build Tuesday, test Wednesday, synthesize Thursday, decide Friday [6]. Many small-batch tests land in the $500 to $1,000 range per cycle [3][4].
Here are the core parts of a simple experiment plan:
| Component | Description | Example |
|---|---|---|
| Assumption | The specific high-risk assumption being tested. | "Small B2B firms will pay $99/mo for automated compliance." |
| Test Method | The smallest, fastest way to get a signal. | Landing page with a "Start Free Trial" button. |
| Target Segment | The specific niche being tested. | Compliance officers at firms with 10–50 employees. |
| Key Metric | The primary data point to be measured. | Click-through rate (CTR) on the CTA button. |
| Success Threshold | The pre-defined "pass" mark. | >15% CTR from 100 targeted visitors. |
| Estimated Budget | Total spend for the cycle. | $200 (for LinkedIn/Google Ads). |
| Timeline | Duration of the experiment. | 1 week (5 business days). |
Keep the assumption, test method, metric, and result in one place. That way, the next cycle starts clean instead of turning into a scavenger hunt through docs, notes, and screenshots. Using the same format every time also makes review and comparison much faster.
"The goal isn't to feel confident. The goal is to become less wrong with each experiment." - Louis Corneloup, Founder at Dupple [4]
4. Build a Repeatable Iteration System
Every test should shape the next move. That means you need a simple system to store evidence, update assumptions, and assign what happens next. Once a new test is in motion, the edge comes from how well your team records, reviews, and reuses what it learns.
4.1 Keep One Source of Truth for Assumptions, Evidence, and Decisions
Put assumptions, evidence, and decisions in one experiment log. For each experiment, record the assumption, the evidence, the verdict, and any surprises. That way, each new test starts from the last decision instead of a mess of scattered notes.
Keep a change log that tracks the status of every assumption - untested, testing, validated, or invalidated - along with the test method used and the date it was last updated [6]. Version and date your assumption map so you can see risks move from unknown to known over time. Update that map on a fixed cadence so old risks don’t just sit there [1].
A log only works if the team actually reviews it on a set schedule.
4.2 Run Regular Review Cycles and Short Retrospectives
Run a biweekly or monthly review with a small cross-functional group. Aim for about 4 to 8 people - product, design, engineering, and one commercial stakeholder - so the discussion stays tight [1].
During each review, ask four questions: What did we assume? What did we find? Does the evidence pass or fail our criteria? What surprised us? [3] End each session with an updated log and one clear decision: Persevere, Pivot, Stop, or Retest [3][6].
If you want these reviews to stay fast and easy to compare, use the same fields every time.
4.3 Standardize Templates, Definitions, and Change Logs
Consistency helps you compare one cycle to the next. Before you run any test, agree on shared definitions for the metrics that matter most - like what counts as an active user, a qualified lead, or willingness to pay [3][7].
Use the same experiment log template every time. Use the same fields every time:
| Standardized Field | Purpose |
|---|---|
| Assumption Statement | The specific, falsifiable belief being tested |
| Experiment Type | The method used (e.g., interview, landing page, prototype) |
| Fail Criterion | The measurable threshold set before the test |
| Actual Result | Raw data collected during the experiment |
| Unexpected Findings | New pains, technical dependencies, or surprises discovered |
| Verdict | Pass, Fail, or Inconclusive |
| Next Action | Pivot, Persevere, Stop, or Retest |
Conclusion: Refine Your Idea Step by Step Using Evidence
After each test, follow the same rhythm: read the evidence, update the assumption, then pick the next experiment.
That order matters. Testing assumptions only helps if it changes what you do next. So don’t stop at the result. Look at what it means, adjust the idea, and go after the biggest risk still left on the table.
With each cycle, you want to spot a weak assumption before it turns into an expensive mistake. That habit is much easier to keep when every assumption, result, and decision lives in one place.
InspectIdea keeps assumptions, evidence, and decisions together, so each cycle starts with a clear view of what you know and what still needs testing. Treat iteration like a repeatable loop: each test cuts risk, each decision leans on evidence, and each cycle makes the idea sharper.
FAQs
::: faq
What should I do if every test result is inconclusive?
If test results are inconclusive, don’t label them a win or a loss based on gut feeling. Write down exactly what you tested and what happened, using objective data instead of personal impressions.
Then check whether the test focused on one specific assumption rather than a broad hypothesis. If the outcome is still unclear, tighten up the prototype and run the test again with a small group of additional customers. Let the evidence tell you whether to adjust your approach or your segment. :::
::: faq
How do I choose the next riskiest assumption?
Map your project assumptions on a 2x2 matrix using importance and certainty.
Then zero in on the assumptions that are high in importance and low in certainty.
Why those? Because if they’re wrong, the project can fall apart. And right now, they’re the ones backed by the least evidence.
InspectIdea can help you sort those assumptions, spot the risky ones fast, and plan experiments to test them. :::
::: faq
When should I pivot instead of retest?
Pivot when the data knocks out your highest-risk assumption against your preset success or kill criteria. In plain English, that means your core idea about the customer, the problem, or the solution doesn’t hold up.
Don’t spend time retesting low-importance guesses that won’t break the model. Pivot when the job-to-be-done or the pattern from your most engaged customers points in a fundamentally different direction. :::